服务器平台:Centos 64bit
一.安装git
如果是一个全新的centos操作系统,需要先下载git

二.安装Go
由于Hugo是基于Go开发的,所以安装Hugo之前需要先安装Go
2.1下载安装包
首先从GoLang中文官网下载go安装包到本地
1
|
wget https://studygolang.com/dl/golang/go1.15.1.linux-amd64.tar.gz
|
执行完后,可以看到已经保存到本地根目录

2.2安装Go到指定目录
安装到指定目录,我这里安装到/usr/local目录
1
|
tar -C /usr/local -xzf go1.15.1.linux-amd64.tar.gz
|
此时go已经安装到了/usr/local/go目录下
输入go version命令判断是否安装成功

2.3配置GoPath
2.3.1创建golang第三方包及项目存放路径GOPATH
1
2
3
|
mkdir -p /usr/local/goPath/src    #存放第三方包及项目
mkdir -p /usr/local/goPath/bin    #存放项目编译后的可执行文件
mkdir -p /usr/local/goPath/pkg    #存放项目编译后的文件
|
2.4 配置环境变量
添加/usr/local/go/bin/目录到环境变量Path,并配置GoRoot
1
2
3
4
5
|
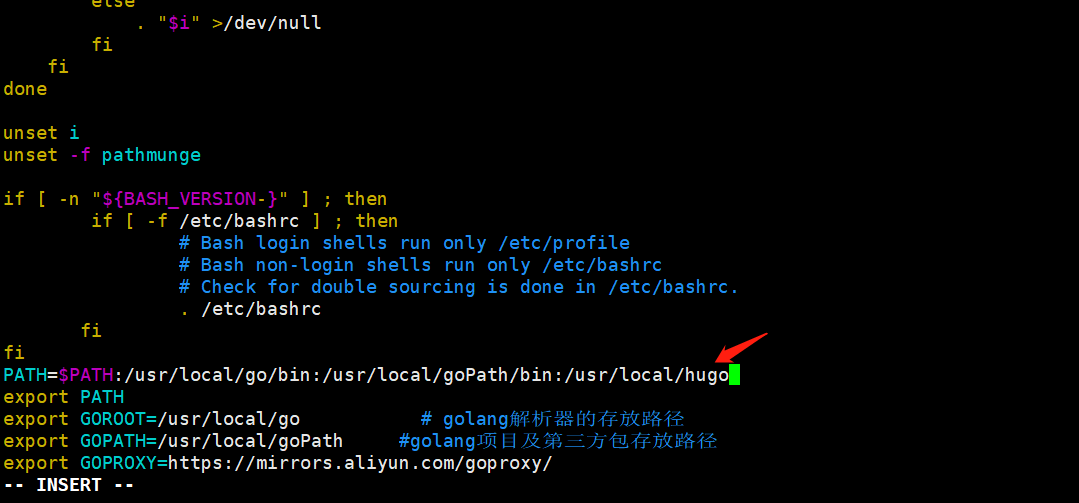
export PATH=$PATH:/usr/local/go/bin:/usr/local/goPath/bin #添加环境变量
export GOROOT=/usr/local/go           # golang解析器的存放路径
export GOPATH=/usr/local/goPath     #golang项目及第三方包存放路径

export GOPROXY=https://mirrors.aliyun.com/goproxy/#设置go代理
|
注意,这样只是暂时有效,如果要永久有效,需要修改
/etc/profile 文件,在文件末尾加上这几行代码,然后运行:
source /etc/profile
2.5查看是否安装成功
输入go env判断是否配置成功
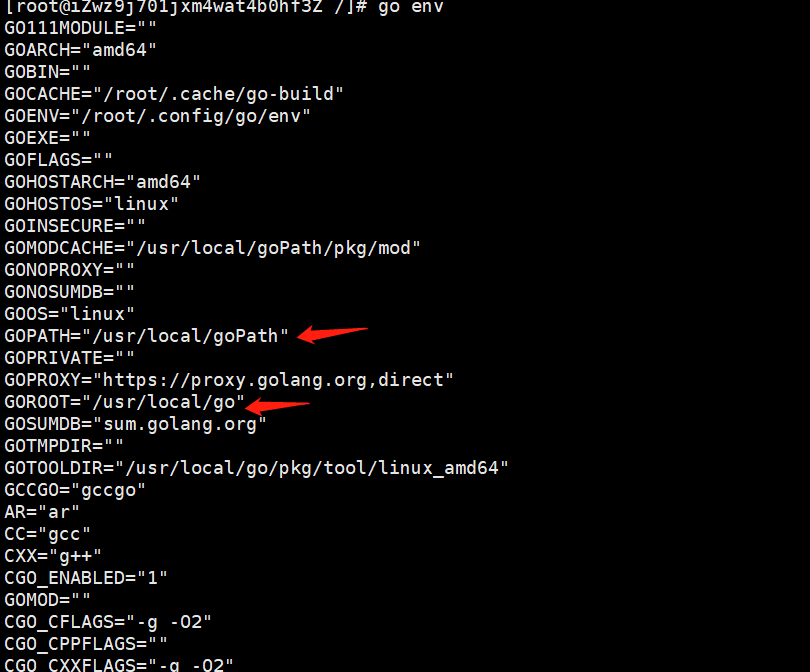
如果打印的GOPATH和GOROOT都是上面配置的路径,说明成功了
三.安装Hugo
Hugo官网:https://gohugo.io
linux下安装Hugo有两种方式,一种是通过Homebrew,那么直接运行
另外一种是通过下载二进制安装包直接安装,这里我们采用这种方式
3.1下载Hugo安装包
到https://github.com/gohugoio/hugo/releases/下载安装包
这里我们选择下图所示的文件进行下载
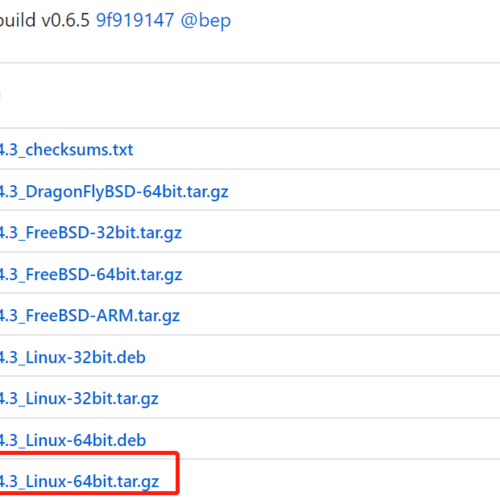
复制链接地址后,下载到本地
1
|
wget https://github.com/gohugoio/hugo/releases/download/v0.74.3/hugo_0.74.3_Linux-64bit.tar.gz
|
ps:如果下载太慢,可以先在本地下载好,然后用rz命令上传到linux,rz命令工具安装命令:
3.2安装hugo安装包
这里我们将hugo命令安装到/usr/local/hugo目录下
1
|
tar -C /usr/local/hugo -xzf hugo_0.74.3_Linux-64bit.tar.gz
|
3.3配置hugo命令到环境变量
如上述配置Go环境变量一样,将/usr/local/hugo目录添加到PATH中
执行命令让环境变量生效:
3.4检查hugo命令是否安装成功
1
|
hugo version #输出Hugo版本号表示安装成功
|

3.5创建Hugo项目
一个Hugo项目就是一个站点,创建命令如下
1
|
hugo new site [project-name]
|
比如我需要在$GOPATH/github.com/blog目录下创建一个blog项目,那么命令如下:
1
2
|
cd /usr/local/goPath/src/github.com/
hugo new site blog
|
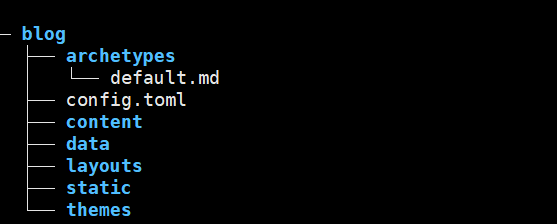
hugo命令会创建一个blog项目,项目结构如下:
1
2
3
4
5
6
7
8
9
|
.
├── archetypes # 存放生成博客的模版
├── assets # 存放被 Hugo Pipes 处理的文件
├── config # 存放 hugo 配置文件 支持 JSON YAML TOML 三种格式配置文件
├── content # 存放 markdown 文件
├── data # 存放 Hugo 处理的数据
├── layouts # 存放布局文件
├── static # 存放静态文件 图片 CSS JS文件
└── themes # 存放主题
|
3.6添加主题
为了快速搭建博客,可以使用主题。使用主题后,只需要向 content 文件夹添加 Markdown 文件即可。
Hugo 有主题市场 https://themes.gohugo.io/ 可以进入挑选。
例如这个主题,网站上的示例图如下:
 https://github.com/olOwOlo/hugo-theme-even
要使用这个主题,直接通过git clone到blog目录
1
2
|
cd blog
git clone https://github.com/olOwOlo/hugo-theme-even themes/even
|
3.7启动Hugo
进入 blog/themes/even/exampleSite 文件夹,将 config.tom 文件拷贝到项目根目录下,同时将 blog/themes/even/exampleSite/content 文件夹覆盖掉根目录下的 content 。
在blog根目录下,命令行输入以下命令,启动 Hugo :
注意:这种方式启动的是本地服务,如果需要将博客网站部署到外网,需要安装服务器,可以是Nginx
四.安装Nginx
4.1使用yum安装
4.2.配置service命令,方便启动、停止nginx服务
安装完成后,在/etc/init.d/目录下编辑文件nginx
1
2
|
cd /etc/init.d/
vim nginx
|
输入如下内容:
  1
  2
  3
  4
  5
  6
  7
  8
  9
 10
 11
 12
 13
 14
 15
 16
 17
 18
 19
 20
 21
 22
 23
 24
 25
 26
 27
 28
 29
 30
 31
 32
 33
 34
 35
 36
 37
 38
 39
 40
 41
 42
 43
 44
 45
 46
 47
 48
 49
 50
 51
 52
 53
 54
 55
 56
 57
 58
 59
 60
 61
 62
 63
 64
 65
 66
 67
 68
 69
 70
 71
 72
 73
 74
 75
 76
 77
 78
 79
 80
 81
 82
 83
 84
 85
 86
 87
 88
 89
 90
 91
 92
 93
 94
 95
 96
 97
 98
 99
100
101
102
103
104
105
106
107
108
109
110
111
112
113
114
115
116
117
118
119
120
121
122
123
124
125
126
127
128
129
|
nx - this script starts and stops the nginx daemon
#
# chkconfig:   - 85 15
# description:  NGINX is an HTTP(S) server, HTTP(S) reverse \
#               proxy and IMAP/POP3 proxy server
# processname: nginx
# config:      /etc/nginx/nginx.conf
# config:      /etc/sysconfig/nginx
# pidfile:     /var/run/nginx.pid

# Source function library.
. /etc/rc.d/init.d/functions

# Source networking configuration.
. /etc/sysconfig/network

# Check that networking is up.
[ "$NETWORKING" = "no" ] && exit 0

nginx="/usr/sbin/nginx"
prog=$(basename $nginx)

NGINX_CONF_FILE="/etc/nginx/nginx.conf"

[ -f /etc/sysconfig/nginx ] && . /etc/sysconfig/nginx

lockfile=/var/lock/subsys/nginx

make_dirs() {
   # make required directories
   user=`$nginx -V 2>&1 | grep "configure arguments:.*--user=" | sed 's/[^*]*--user=\([^ ]*\).*/\1/g' -`
   if [ -n "$user" ]; then
      if [ -z "`grep $user /etc/passwd`" ]; then
         useradd -M -s /bin/nologin $user
      fi
      options=`$nginx -V 2>&1 | grep 'configure arguments:'`
      for opt in $options; do
          if [ `echo $opt | grep '.*-temp-path'` ]; then
              value=`echo $opt | cut -d "=" -f 2`
              if [ ! -d "$value" ]; then
                  # echo "creating" $value
                  mkdir -p $value && chown -R $user $value
              fi
          fi
       done
    fi
}

start() {
    [ -x $nginx ] || exit 5
    [ -f $NGINX_CONF_FILE ] || exit 6
    make_dirs
    echo -n $"Starting $prog: "
    daemon $nginx -c $NGINX_CONF_FILE
    retval=$?
    echo
    [ $retval -eq 0 ] && touch $lockfile
    return $retval
}

stop() {
    echo -n $"Stopping $prog: "
    killproc $prog -QUIT
    retval=$?
    echo
    [ $retval -eq 0 ] && rm -f $lockfile
    return $retval
}

restart() {
    configtest || return $?
    stop
    sleep 1
    start
}

reload() {
    configtest || return $?
    echo -n $"Reloading $prog: "
    killproc $nginx -HUP
    RETVAL=$?
    echo
}

force_reload() {
    restart
}

configtest() {
  $nginx -t -c $NGINX_CONF_FILE
}

rh_status() {
    status $prog
}

rh_status_q() {
    rh_status >/dev/null 2>&1
}

case "$1" in
    start)
        rh_status_q && exit 0
        $1
        ;;
    stop)
        rh_status_q || exit 0
        $1
        ;;
    restart|configtest)
        $1
        ;;
    reload)
        rh_status_q || exit 7
        $1
        ;;
    force-reload)
        force_reload
        ;;
    status)
        rh_status
        ;;
    condrestart|try-restart)
        rh_status_q || exit 0
            ;;
    *)
        echo $"Usage: $0 {start|stop|status|restart|condrestart|try-restart|reload|force-reload|configtest}"
        exit 2
esac
|
然后保存,并将这个文件赋予可执行权限:
执行完后,可以通过下面4个命令来开启、关闭、重启nginx服务
1
2
3
4
|
service start nginx #开启服务
service stop nginx #停止服务
service restart nginx #重启服务
service reload nginx #重新加载服务
|
ps:可以输入 ps aux|grep nginx 命令来查看nginx服务器是否启动
4.3.将博客网站配置到nginx服务器
- 找到nginx的安装目录,默认是
/etc/nginx/,编辑默认的配置文件
1
2
|
cd /etc/nginx
vim nginx.conf
|
改动默认的配置如下:主要改动3个点
 1
 2
 3
 4
 5
 6
 7
 8
 9
10
11
12
13
14
15
16
17
18
|
http {
    server {
        listen       80; ## 改动点1:输入想要监听的端口号
        server_name  www.jalen-qian.com; ##改动点2:填写外网访问博客网站的域名或者外网IP(无域名时)

        # Load configuration files for the default server block.
        include /etc/nginx/default.d/*.conf;

        location / {
        root         /usr/local/goPath/src/github.com/blog/public; ##改动点3:输入nginx需要找到博客网站项目的路径,注意是public目录
        }

        error_page 404 /404.html;
            location = /40x.html {
        }


}
|
然后重启服务service restart nginx
五.通过nginx启动Hugo
进入博客项目根目录,输入命令
1
2
3
|
hugo --theme=even --baseUrl="http:www.jalen-qian.com"
## --theme后面跟的是主题名称,你下载了什么主题,就写对应的名字
## --baseUrl后面是外网通过nginx访问Hugo项目的路径,注意要与上面nginx.conf中的一致
|
六.更新博客
博客更新很简单,只需要在content/post目录更新.md文件,然后运行
hugo --theme=even --baseUrl="http:www.jalen-qian.com"重新发布即可