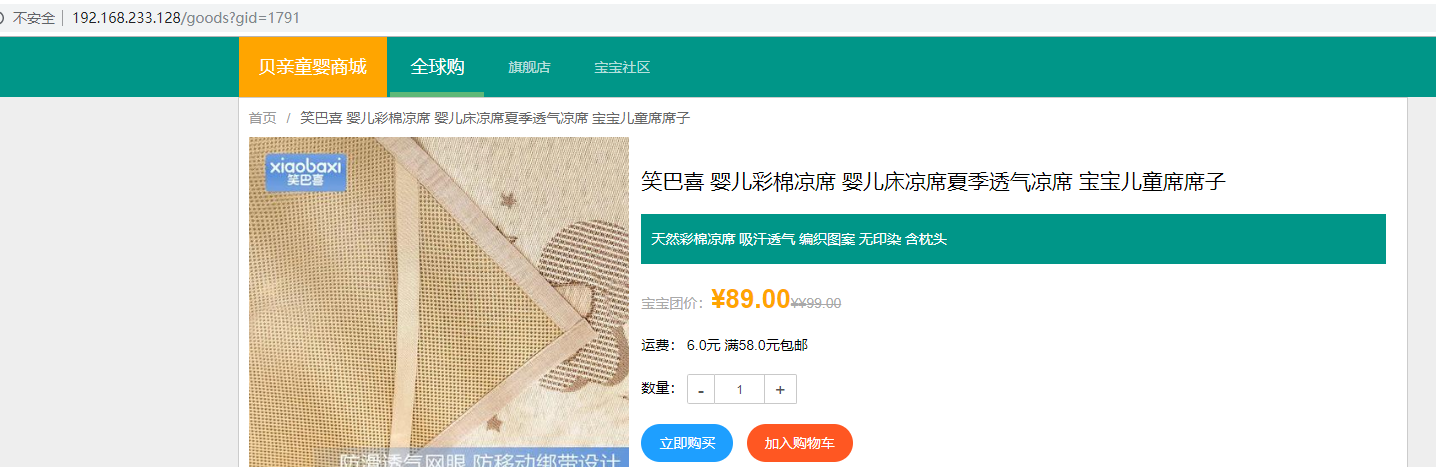
After studying the previous articles, we now have a basic understanding of how to deploy an application, create shared storage, implement load balancing through services, and expose services externally through Renetd. Next, we will move on to a practical exercise: deploying the Pigeon Store, an e-commerce web application developed with Spring Boot.
Deployment Topology
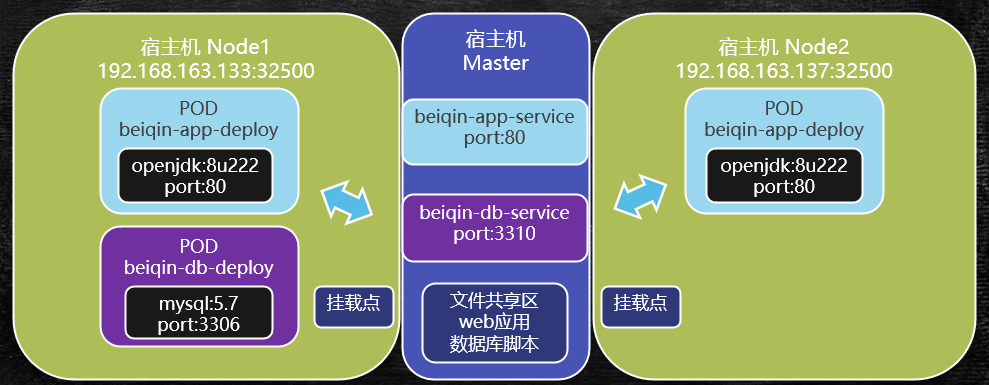
From this topology diagram, we can see that:
- The shared storage area on the master node contains database scripts used to initialize the
MySql database, which is deployed in a pod. - The
MySql service is exposed within the cluster through the beiqin-db-service service. - The web service, developed with Spring Boot, is deployed using the
openjdk:8u222 base image, and the container exposes port 80. - The Pigeon Store application is exposed externally through the
beiqin-app-service service, also on port 80. Renetd is used to map the host IP to the virtual IP of the beiqin-app-service service, ultimately making the service accessible from outside the cluster.
Deploying the Pigeon Store
Deployment Resources
We will place the deployment scripts, service JAR package, MySQL script files, and other resources in the /usr/local/data/www-data/beiqin/ directory.
Here, /usr/local/data/www-data/ is the shared storage area configured in the previous article.
The following are all the resource files required to deploy the Pigeon Store application. We will create and deploy them one by one.
 1
 2
 3
 4
 5
 6
 7
 8
 9
10
11
| [root@master www-data]# tree beiqin
beiqin
├── beiqin-app-deploy.yml # Web applies deployment script files
├── beiqin-app-service.yml # Web Application Service Deployment Script File
├── beiqin-db-deploy.yml # Mysql deploys script files
├── beiqin-db-service.yml # Mysql Service Deployment Script File
├── dist
│ ├── application.yml # Application Profile
│ └── beiqin-app.jar # Spring-boot developed application jar package, which can run directly in openjdk containers
└── sql
└── beiqin.sql # Mysql script file
|
Deploying the Pigeon Store
1. Create an NFS File Share on the Master and Mount It on the Node
Here, we will reuse the configuration from K8S Notes 5: NFS-Based Cluster File Sharing, mounting the master node’s /usr/local/data/www-data/ directory to the /mnt directory on the node host. The details will not be repeated here.
2. Deploy and Initialize the Database
2.1 Create the beiqin-db-deploy.yml File
 1
 2
 3
 4
 5
 6
 7
 8
 9
10
11
12
13
14
15
16
17
18
19
20
21
22
23
24
25
26
| apiVersion: apps/v1beta1 # New version of k8s, version number.
kind: Deployment # Script Type: Create Deployment
metadata:
name: beiqin-db-deploy # Name of deployment
spec:
replicas: 1 # The number of copies, because it's mysql, only one.
template:
metadata:
labels:
app: beiqin-db-deploy # Pod tag
spec:
volumes: # Create Mount Volume
- name: beiqin-db-volume # Mount Volume Name
hostPath:
path: /mnt/beiqin/sql # Mount path (the path of the data volume on the Node host)
containers:
- name: beiqin-db-deploy
image: mysql:5.7 # Use mirror: Mysql: 5.7
ports:
- containerPort: 3306 # Port number of container to cluster exposure: 3306
env: # Note: env is a previously unconfigured environmental variable for containers
- name: MYSQL_ROOT_PASSWORD # Environmental variable 1: Mysql root password
value: "root" # The value of the environment variable. Note the string.
volumeMounts: # Can not open message
- name: beiqin-db-volume
mountPath: /docker-entrypoint-initdb.d # Mount path, mount to this directory and automatically load the sql script file in the container when it starts
|
2.2 Deploy MySQL to the Cluster
1
2
| # cd /usr/local/data/www-data/beiqin
$ kubectl create -f beiqin-db-deploy.yml
|
2.3 Check the Deployment Status
 1
 2
 3
 4
 5
 6
 7
 8
 9
10
11
12
13
14
15
16
17
18
19
20
21
22
23
24
25
26
27
28
29
30
31
32
33
34
35
36
37
38
39
40
41
42
| # View deployed pops
$ kubectl get pod -o wide
NAME READY STATUS RESTARTS AGE IP NODE NOMINATED NODE READINESS GATES
beiqin-db-deploy-757d87dc77-g5wrf 1/1 Running 0 5m17s 10.244.1.12 node1 <none> <none>
# Go inside the pod container and see if mysql can log in and & execute scripts to create databases and tables
$ kubectl exec -it beiqin-db-deploy-757d87dc77-g5wrf /bin/bash
# Inside the container, login mesql
$ mysql -uroot -proot
# View the database and find that it has been created
mysql> show databases;
+--------------------+
| Database |
+--------------------+
| information_schema |
| beiqin |
| mysql |
| performance_schema |
| sys |
+--------------------+
5 rows in set (0.06 sec)
# View the table and find it already created
mysql> use beiqin;
Reading table information for completion of table and column names
You can turn off this feature to get a quicker startup with -A
Database changed
mysql> show tables;
+---------------------+
| Tables_in_beiqin |
+---------------------+
| t_category |
| t_evaluate |
| t_goods |
| t_goods_cover |
| t_goods_detail |
| t_goods_param |
| t_promotion_seckill |
+---------------------+
7 rows in set (0.00 sec)
|
2.4 Edit the Database Service Script
Create beiqin-db-service.yml. This script is much simpler than the deployment script.
 1
 2
 3
 4
 5
 6
 7
 8
 9
10
11
12
| apiVersion: v1
kind: Service # Type: Services
metadata:
name: beiqin-db-service # Name of service
labels: # The service is also a special pod that needs to be configured.
app: beiqin-db-service
spec:
selector: # Select associated pop tag, which is the db deployment pop created in the previous step
app: beiqin-db-deploy
ports:
- port: 3310 # Service external exposure port, outside container, inside cluster
targetPort: 3306 # Port within service container
|
2.5 Deploy the Service
 1
 2
 3
 4
 5
 6
 7
 8
 9
10
11
12
13
14
15
16
17
18
19
20
21
22
| $ kubectl create -f beiqin-db-service.yml
# Kubecl get svc and kubecl get service fully equivalent
$ kubectl get svc
NAME TYPE CLUSTER-IP EXTERNAL-IP PORT(S) AGE
beiqin-db-service ClusterIP 10.107.5.137 <none> 3310/TCP 7s
kubernetes ClusterIP 10.96.0.1 <none> 443/TCP 27h
# Here we can see that the service's virtual IP is 10.107.5.137 and the external exposure port is 3310 (outside pod, inside the cluster)
# See more details about the service
$ kubectl describe svc beiqin-db-service
Name: beiqin-db-service
Namespace: default
Labels: app=beiqin-db-service
Annotations: <none>
Selector: app=beiqin-db-deploy
Type: ClusterIP
IP: 10.107.5.137 # Virtual IP
Port: <unset> 3310/TCP # Externally exposed port
TargetPort: 3306/TCP # Destination Port
Endpoints: 10.244.1.12:3306 # Associated pod virtual IPs and port numbers. 10.244.1.12 is the virtual IP for db deployment pops initiated.
Session Affinity: None
Events: <none>
|
3. Deploy the Web Application and Initialize the Service
3.1 Create the Deployment Script
Edit the beiqin-app-deploy.yml file.
 1
 2
 3
 4
 5
 6
 7
 8
 9
10
11
12
13
14
15
16
17
18
19
20
21
22
23
| apiVersion: apps/v1beta1
kind: Deployment
metadata:
name: beiqin-app-deploy
spec:
replicas: 2 # Number of copies: 2
template:
metadata:
labels:
app: beiqin-app-deploy
spec:
volumes:
- name : beqin-app-volume
hostPath:
path: /mnt/beiqin/dist # Mount directory of the data host to store the jar package and application configuration
containers:
- name: beiqin-app-deploy
image: openjdk:8u222-jre # Portable mirror, using openjdk:8u222-jre
command: ["/bin/sh"] # Note: Herecommand indicates the direction of the container when activated, and here the shell command.
args: ["-c","cd /usr/local/beiqin/dist;java -jar beiqin-app.jar"] # Command Parameters
volumeMounts:
- name: beqin-app-volume
mountPath: /usr/local/beiqin/dist # Table of contents mounted in containers
|
3.2 Create the Deployment
1
2
3
4
5
6
7
| $ kubectl create -f beiqin-app-deploy.yml
deployment.apps/beiqin-app-deploy created
$ kubectl get pod -o wide
NAME READY STATUS RESTARTS AGE IP NODE NOMINATED NODE READINESS GATES
beiqin-app-deploy-5958f57879-n9p9b 1/1 Running 0 75s 10.244.2.17 node2 <none> <none>
beiqin-app-deploy-5958f57879-nfs8s 1/1 Running 0 75s 10.244.1.19 node1 <none> <none>
beiqin-db-deploy-757d87dc77-g5wrf 1/1 Running 2 2d19h 10.244.1.17 node1 <none> <none>
|
3.3 Create the Service
Edit the service script and add the following content:
 1
 2
 3
 4
 5
 6
 7
 8
 9
10
11
12
13
| $ vim beiqin-app-service.yml
apiVersion: v1
kind: Service
metadata:
name: beiqin-app-service
labels:
app: beiqin-app-service
spec:
selector:
app: beiqin-app-deploy
ports:
- port: 80
targetPort: 80
|
Create the service in the cluster:
1
2
3
4
5
6
7
8
| $ kubectl create -f beiqin-app-service.yml
service/beiqin-app-service created
# View service pod status
$ kubectl get svc
NAME TYPE CLUSTER-IP EXTERNAL-IP PORT(S) AGE
beiqin-app-service ClusterIP 10.97.138.238 <none> 80/TCP 58s
beiqin-db-service ClusterIP 10.107.5.137 <none> 3310/TCP 2d19h
kubernetes ClusterIP 10.96.0.1 <none> 443/TCP 3d22h
|
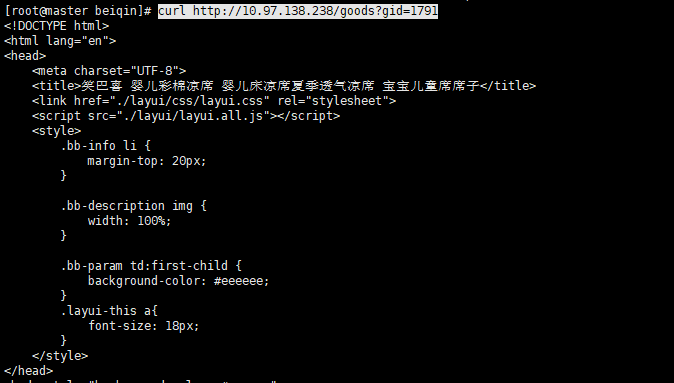
At this point, the Pigeon Store has been fully deployed to the cluster environment. We can see that the service’s virtual IP is 10.97.138.238. We can now verify whether port 80 on this service IP is accessible.
3.4 Verify the Service
1
| $ curl http://10.97.138.238/goods?gid=1791
|
4. Expose the Service Externally Using Rinetd
1
2
3
| $ vim /etc/rinetd.conf
0.0.0.0 80 10.97.138.238 80
$ rinetd -c /etc/rinetd.conf
|
Finally, we successfully accessed the service locally through the IP address of the virtual machine’s master node.