In the previous article, we introduced how to deploy a Tomcat cluster using an yml script and the kubectl command. We mainly covered how to create a deployment and a service that exposes ports for external access. The deployed service acts as a proxy and load balancer.
Because multiple pod instances provide services simultaneously, handling shared data or files can be difficult. In this section, we will introduce a solution: sharing files from a server through NFS and using a mount command to mount the shared folder into pod containers. This way, every pod accesses the same files, and any file modified by one pod is updated across the entire cluster in real time.
Introduction to NFS
NFS (Network File System) is a network file system developed by SUN. It is a Unix presentation-layer protocol that allows users to access files elsewhere on a network as if they were using their own computer.
NFS is a TCP-based application. Its core implementation uses RPC (Remote Procedure Call) to transfer files while ensuring that the caller can use remote files as conveniently as local files.
Cluster File Sharing
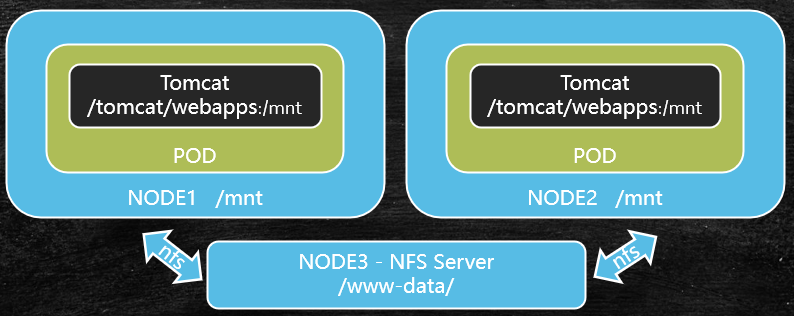
How can multiple Pod instances in a cluster read and write the same data? As shown in the diagram below, we can add a new node that provides an NFS service, while our Tomcat Pod communicates with this node through NFS.
- First, the shared folder of the NFS service is
www-data - Then, the
/mntfolders ofnode1andnode2are bound towww-datathrough the NFS protocol - Finally, use the mount command to mount the
/mntfolder of each node to the/tomcat/webappsfolder in the container
Procedure
A Node is required as the NFS service node. We will directly use the master node as the shared file node. Perform the following operations on the master:
First, install the
NFS toolsandrpcbind.1$ yum install -y nfs-utils rpcbindCreate a shared folder. In this example, it is
/usr/local/data/www-data1$ mkdir /usr/local/data/www-dataConfigure the NFS shared directory
1
2
# Note that 192.168.233.128 is the master's IP address, rw means readable and writable, and sync means synchronous sharing $ echo "/usr/local/data/www-data 192.168.233.128/24(rw,sync)" > /etc/exportsStart the
nfsandrpcservices, and configure both services to start automatically at boot1 2 3 4 5$ systemctl start nfs $ systemctl start rpcbind # Configure the services to start automatically at boot $ systemctl enable nfs $ systemctl enable rpcbindCheck whether the
nfsfile share was configured successfully1 2 3 4$ exportfs # The following output indicates that the NFS shared folder was configured successfully /usr/local/data/www-data 192.168.233.128/24
Using the NFS Service on Clients
On the host where the client Node is located, install the
NFS toolset. You only need to installnfs-tools; there is no need to installrpcbind.1 2$ yum install -y nfs-utils $ systemctl enable nfs # Configure it to start automatically at bootCheck whether the NFS service on the master node is accessible
1 2 3 4$ showmount -e 192.168.233.128 # 192.168.233.128 is the NFS service provider, namely the IP address of the host where the master node is located # The following output indicates that the service is accessible Export list for 192.168.233.128: /usr/local/data/www-data 192.168.233.128/24Use the
mountcommand to mount the directory1$ mount 192.168.233.128:/usr/local/data/www-data /mntVerify that the mount was successful
Create a file named
test.txtin thewww-datafolder on the master node1$ echo "我是主节点,hello" > /usr/local/data/www-data/test.txtThen check whether the file exists in the
/mntdirectory on the client node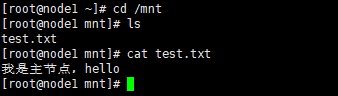
The file is accessible, indicating that the mount was successful.
Using NFS Shared Files in Containers
In the previous step, we mounted the shared files on every node. We now need to mount the /mnt folder on each node into the Tomcat container in the pod.
You can update this Tomcat cluster using the kubel apply command, or use kubel delete to delete the cluster-related resources and then recreate the cluster. Here, we will use the second method.
Remove the old Tomcat Deployment and Service
1 2 3 4 5 6 7 8# View the deployment list $ kubectl get deployment # Delete the deployment named tomcat-deploy $ kubectl delete deployment tomcat-deploy # View the service list $ kubectl get service # Delete the service named tomcat-deploy $ kubectl delete service tomcat-deployModify the
Deploymentconfiguration file and add the mount configuration. Comments have been added to all newly added lines1 2 3 4 5 6 7 8 9 10 11 12 13 14 15 16 17 18 19 20 21 22 23apiVersion: extensions/v1beta1 kind: Deployment metadata: name: tomcat-deploy spec: replicas: 2 template: metadata: labels: app: tomcat-cluster spec: volumes: # Create a mounted data volume - name: web-app # Data volume name hostPath: # Path of the data volume on the host path: /mnt containers: - name: tomcat-cluster image: tomcat:latest ports: - containerPort: 8080 volumeMounts: # Create a container data volume - name: web-app # Data volume name mountPath: /usr/local/tomcat/webapps # Path mounted in the containerRecreate
deployment1 2 3 4# Create the deployment $ kubectl create -f tomcat-deploy.yml # Check the deployment status $ kubectl get deploymentCheck whether the mount was successful
We can log in to the host where each pod is located and use
docker psto view the running containers, as shown below
We can then use the
docker exec -it [container-ID] /bin/bashcommand to enter the container and check whether the mounted files exist in the/usr/local/tomcat/webappsfolder.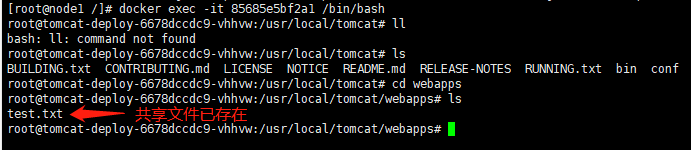
This approach is too cumbersome. Can we use the
kubectlcommand on themasternode to enter a container on a child node? The answer is yes.1 2 3 4# Check the pod status $ kubectl get pod # Enter the container $ kubectl exec -it [pod名称] /bin/bash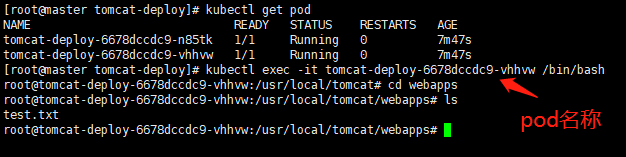
This completes the configuration of NFS-based file sharing for the K8S cluster.
Configuring Automatic NFS Mounting on Clients
Mounts created using the mount command will be lost after the system restarts, so /etc/fstab must be configured.
| |