Server platform: CentOS 64-bit
1. Install Git
If you are using a fresh CentOS operating system, you first need to install Git.

2. Install Go
Because Hugo is developed in Go, you need to install Go before installing Hugo.
2.1 Download the Installation Package
First, download the Go installation package locally from the Chinese GoLang website.
1
| wget https://studygolang.com/dl/golang/go1.15.1.linux-amd64.tar.gz
|
After the command finishes, you can see that the package has been saved to the local root directory.

2.2 Install Go in the Specified Directory
Install Go in a specified directory. Here, I install it in the /usr/local directory.
1
| tar -C /usr/local -xzf go1.15.1.linux-amd64.tar.gz
|
Go is now installed in the /usr/local/go directory.
Enter the go version command to verify whether the installation was successful.

2.3.1 Create GOPATH for Third-Party Go Packages and Projects
1
2
3
| mkdir -p /usr/local/goPath/src #Storage of third-party packages and projects
mkdir -p /usr/local/goPath/bin #Storage of project compiled and enforceable documents
mkdir -p /usr/local/goPath/pkg #Store compiled project documents
|
Add the /usr/local/go/bin/ directory to the PATH environment variable and configure GOROOT.
1
2
3
4
5
| export PATH=$PATH:/usr/local/go/bin:/usr/local/goPath/bin #Add Environment Variable
export GOROOT=/usr/local/go # Path to storage of galang resolver
export GOPATH=/usr/local/goPath #Path to storage for galang projects and third-party packages
export GOPROXY=https://mirrors.aliyun.com/goproxy/#Setup GoAgent
|
Note that this is only temporary. To make it permanent, modify the
/etc/profile file, add these lines of code to the end of the file, and then run:
source /etc/profile
2.5 Verify the Installation
Enter go env to verify whether the configuration was successful.
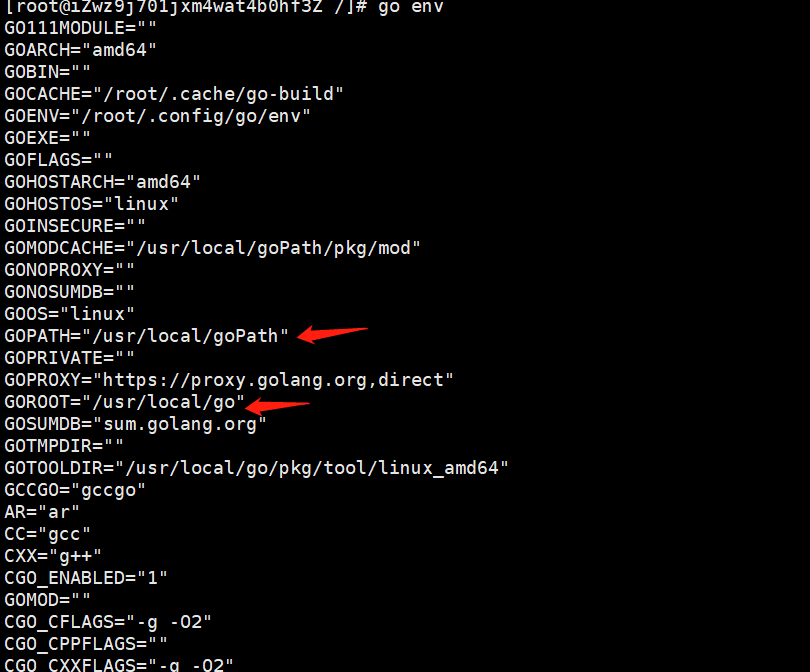
If the printed GOPATH and GOROOT values both match the paths configured above, the configuration was successful.
3. Install Hugo
Hugo official website: https://gohugo.io
There are two ways to install Hugo on Linux. One is through Homebrew, in which case you can simply run:
The other is to install it directly from a downloaded binary package. We will use this method here.
3.1 Download the Hugo Installation Package
Download the installation package from https://github.com/gohugoio/hugo/releases/.
Here, we select the file shown below for download.
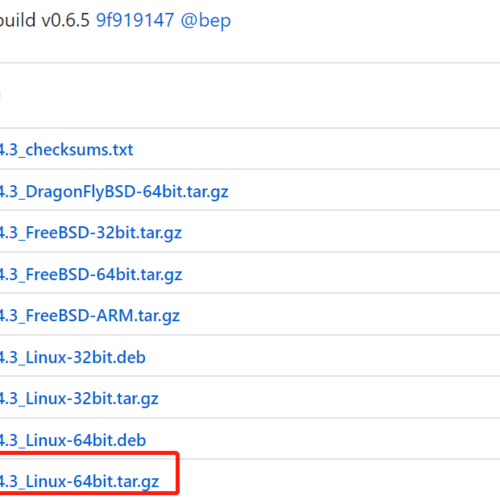
After copying the link address, download it locally.
1
| wget https://github.com/gohugoio/hugo/releases/download/v0.74.3/hugo_0.74.3_Linux-64bit.tar.gz
|
P.S. If the download is too slow, you can download it to your local computer first and then upload it to Linux using the rz command. Install the rz command-line tool with:
3.2 Install the Hugo Package
Here, we install the Hugo command in the /usr/local/hugo directory.
1
| tar -C /usr/local/hugo -xzf hugo_0.74.3_Linux-64bit.tar.gz
|
3.3 Add the Hugo Command to the Environment Variables
As with the Go environment variable configuration above, add the /usr/local/hugo directory to PATH.
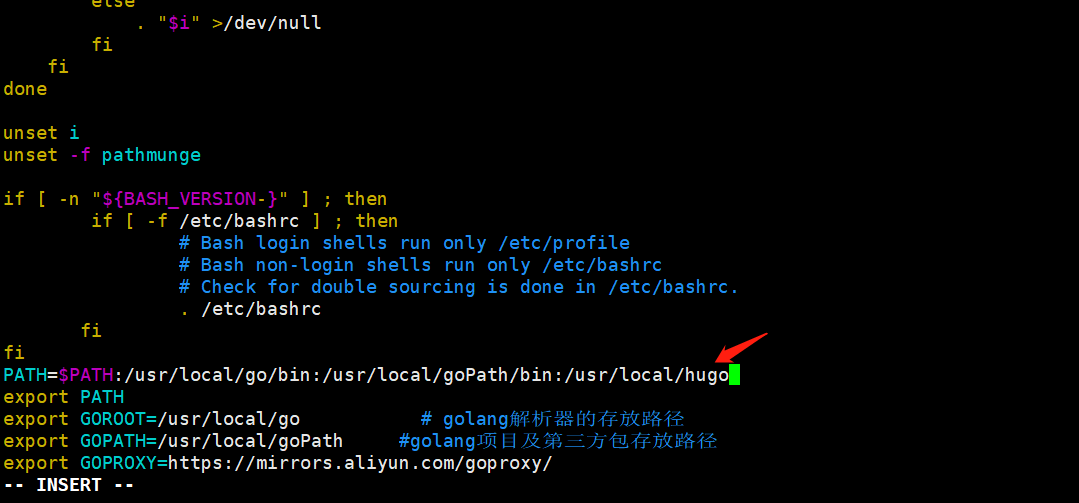
Run the following command to apply the environment variables:
3.4 Verify That Hugo Was Installed Successfully
1
| hugo version #Output Hugo version number means installation is successful
|

3.5 Create a Hugo Project
A Hugo project is a website. Use the following command to create one:
1
| hugo new site [project-name]
|
For example, to create a blog project in the $GOPATH/github.com/blog directory, run:
1
2
| cd /usr/local/goPath/src/github.com/
hugo new site blog
|
The Hugo command creates a blog project with the following structure:

1
2
3
4
5
6
7
8
9
| .
├── archetypes # Store template for blogging
├── assets # Store files processed by Hugo Pipes
├── config # Store the hogo configuration file Supports the JSON YAML TOML configuration file
├── content # Store markdown files
├── data # Store data processed by Hugo
├── layouts # Store Layout File
├── static # Store static files
└── themes # Store Theme
|
3.6 Add a Theme
To quickly set up a blog, you can use a theme. After applying a theme, you only need to add Markdown files to the content folder.
Hugo has a theme marketplace at https://themes.gohugo.io/ where you can browse and select a theme.
For example, the following image shows the preview of this theme on the website:

https://github.com/olOwOlo/hugo-theme-even
To use this theme, clone it directly into the blog directory with Git:
1
2
| cd blog
git clone https://github.com/olOwOlo/hugo-theme-even themes/even
|
3.7 Start Hugo
Open the blog/themes/even/exampleSite folder and copy the config.tom file to the project root directory. Then replace the content folder in the root directory with the blog/themes/even/exampleSite/content folder.
From the blog root directory, enter the following command to start Hugo:
Note: This method starts a local service. To deploy the blog publicly, you need to install a web server such as Nginx.
4. Install Nginx
4.1 Install with Yum
After installation, edit the nginx file in the /etc/init.d/ directory.
1
2
| cd /etc/init.d/
vim nginx
|
Enter the following content:
  1
  2
  3
  4
  5
  6
  7
  8
  9
 10
 11
 12
 13
 14
 15
 16
 17
 18
 19
 20
 21
 22
 23
 24
 25
 26
 27
 28
 29
 30
 31
 32
 33
 34
 35
 36
 37
 38
 39
 40
 41
 42
 43
 44
 45
 46
 47
 48
 49
 50
 51
 52
 53
 54
 55
 56
 57
 58
 59
 60
 61
 62
 63
 64
 65
 66
 67
 68
 69
 70
 71
 72
 73
 74
 75
 76
 77
 78
 79
 80
 81
 82
 83
 84
 85
 86
 87
 88
 89
 90
 91
 92
 93
 94
 95
 96
 97
 98
 99
100
101
102
103
104
105
106
107
108
109
110
111
112
113
114
115
116
117
118
119
120
121
122
123
124
125
126
127
128
129
| nx - this script starts and stops the nginx daemon
#
# chkconfig: - 85 15
# description: NGINX is an HTTP(S) server, HTTP(S) reverse \
# proxy and IMAP/POP3 proxy server
# processname: nginx
# config: /etc/nginx/nginx.conf
# config: /etc/sysconfig/nginx
# pidfile: /var/run/nginx.pid
# Source function library.
. /etc/rc.d/init.d/functions
# Source networking configuration.
. /etc/sysconfig/network
# Check that networking is up.
[ "$NETWORKING" = "no" ] && exit 0
nginx="/usr/sbin/nginx"
prog=$(basename $nginx)
NGINX_CONF_FILE="/etc/nginx/nginx.conf"
[ -f /etc/sysconfig/nginx ] && . /etc/sysconfig/nginx
lockfile=/var/lock/subsys/nginx
make_dirs() {
# make required directories
user=`$nginx -V 2>&1 | grep "configure arguments:.*--user=" | sed 's/[^*]*--user=\([^ ]*\).*/\1/g' -`
if [ -n "$user" ]; then
if [ -z "`grep $user /etc/passwd`" ]; then
useradd -M -s /bin/nologin $user
fi
options=`$nginx -V 2>&1 | grep 'configure arguments:'`
for opt in $options; do
if [ `echo $opt | grep '.*-temp-path'` ]; then
value=`echo $opt | cut -d "=" -f 2`
if [ ! -d "$value" ]; then
# echo "creating" $value
mkdir -p $value && chown -R $user $value
fi
fi
done
fi
}
start() {
[ -x $nginx ] || exit 5
[ -f $NGINX_CONF_FILE ] || exit 6
make_dirs
echo -n $"Starting $prog: "
daemon $nginx -c $NGINX_CONF_FILE
retval=$?
echo
[ $retval -eq 0 ] && touch $lockfile
return $retval
}
stop() {
echo -n $"Stopping $prog: "
killproc $prog -QUIT
retval=$?
echo
[ $retval -eq 0 ] && rm -f $lockfile
return $retval
}
restart() {
configtest || return $?
stop
sleep 1
start
}
reload() {
configtest || return $?
echo -n $"Reloading $prog: "
killproc $nginx -HUP
RETVAL=$?
echo
}
force_reload() {
restart
}
configtest() {
$nginx -t -c $NGINX_CONF_FILE
}
rh_status() {
status $prog
}
rh_status_q() {
rh_status >/dev/null 2>&1
}
case "$1" in
start)
rh_status_q && exit 0
$1
;;
stop)
rh_status_q || exit 0
$1
;;
restart|configtest)
$1
;;
reload)
rh_status_q || exit 7
$1
;;
force-reload)
force_reload
;;
status)
rh_status
;;
condrestart|try-restart)
rh_status_q || exit 0
;;
*)
echo $"Usage: $0 {start|stop|status|restart|condrestart|try-restart|reload|force-reload|configtest}"
exit 2
esac
|
Then save the file and make it executable:
Afterward, you can use the following four commands to start, stop, and restart the Nginx service:
1
2
3
4
| service start nginx #Open service.
service stop nginx #Stop Service
service restart nginx #Restart Service
service reload nginx #Reload Service
|
P.S. You can enter the ps aux|grep nginx command to check whether the Nginx server is running.
4.3 Configure the Blog Website on the Nginx Server
- Locate the Nginx installation directory, which is
/etc/nginx/ by default, and edit the default configuration file:
1
2
| cd /etc/nginx
vim nginx.conf
|
Modify the default configuration as follows. There are three main changes:
 1
 2
 3
 4
 5
 6
 7
 8
 9
10
11
12
13
14
15
16
17
18
| http {
server {
listen 80; ## Change point 1: Enter the port number that you want to listen to
server_name www.jalen-qian.com; ##Change point 2: Fill out the domain name or IP of the website (when no domain name exists)
# Load configuration files for the default server block.
include /etc/nginx/default.d/*.conf;
location / {
root /usr/local/goPath/src/github.com/blog/public; ##Change point 3: Enter nginx needs to find a path to the blog project, note the public directory
}
error_page 404 /404.html;
location = /40x.html {
}
}
|
Then restart the service with service restart nginx.
5. Serve Hugo Through Nginx
Open the blog project’s root directory and enter the following command:
1
2
3
| hugo --theme=even --baseUrl="http:www.jalen-qian.com"
## Theme is followed by a theme name.
## --baseUrl is followed by an extranet access path to the Hugo project via nginx, with attention to consistency with the above nginx.conf
|
6. Update the Blog
Updating the blog is simple. You only need to update the .md files in the content/post directory, and then run
hugo --theme=even --baseUrl="http:www.jalen-qian.com" to publish the site again.